.png)
Cosplay DIY: The Morrigan/Babd from The Wicked + The Divine
- Jessaca Willis

- Feb 3, 2019
- 10 min read
Updated: Jan 31, 2020

What do you get when you cross a Halloween enthusiast with someone who enjoys reading comics? Someone obsessed with cosplay! At least, that's my theory.
I remember the first costume I ever “made”. Talk about DIY. I was Daenerys Targaryen for Halloween, an outfit which consisted of a bunch of scraps of fabric that I'd tied around myself (her season-1-living-on-the-desert-with-the-Dothraki look). I’ll admit, it wasn’t the greatest cosplay ever. It wasn’t even the okayest cosplay ever. But I had a lot of fun with it and it’s what inspired me to make all of the ones that came after!
Shortly after the Daenerys Halloween, I learned how to sew. It was game over from then on! No project was impossible. I’ve cosplayed as:
Codex from The Guild webseries
Poison Ivy
Princess Zelda from The Legend of Zelda: Ocarina of Time videogame
Blake Belladonna from the RWBY anime webseries
Ruby Rose from the RWBY anime webseries
Raven from the Teen Titans animated series
*Hopefully, there will come a point in time when some of the aforementioned cosplays also have linked tutorials
But by far, the most satisfying—and most challenging—cosplay was The Morrigan: Babd from The Wicked and The Divine graphic novels. This is one of my all-time favorite graphic novels and, as a wannabe-goth, of course Babd (and Baphomet) are my favorite characters!
I made Babd in February 2017 (don't let the date on my photos fool you... the date setting on my camera is off). It was the first cosplay I ever did entirely on my own; no tutorial was available online (hence why I thought I’d make one on it)!
So grab your thread and nestle up next to your sewing machine, because I'm going to show you how to DIY: Morrigan/Babd-style!
DISCLAIMER: I am not a professional seamstress. My sewing skills are absolutely basic, and I was 98% self-taught (aside from a few online tutorials or advice from my mom and a sewing friend). I’m sure there are much better, faster, easier ways to create this costume, but I don’t know them. Feel free to change it up though!
Materials
Remember when I said I’m not a professional seamstress? Well it’s about to really show! I just guesstimated how much fabric I would need and I wound up with SO much more than was necessary. I also don’t know what kind of material I purchased (sorry!)… I told you, I was just winging it! But chances are, if you’re embarking on this cosplay adventure, you probably know a thing or two about fabrics that work well for tops and bottoms.

TOP PIECE (all black)
3 yards of something shimmery
3 yards of velvet
3 yards of lace
4 yards of something with some elasticity but that looks formal
1 spool/bundle of interface
1 22” black zipper (depends on your dimensions)
BOTTOM SKIRT (also black)
*4.5 yards of formal gown fabric (get more for a more flowy skirt!)
*1 6” black zipper
ACCESSORIES
1 silver feather jewelry
Fishing line
1 medium cardboard box
3 packaged of black feather trim
1 package of long loose black feathers
Black eye shadow
GENERAL
Sewing scissors
Needles (for stretch, regular, and denim)
Black thread
Measuring tape
Tracing/pattern paper
Regular paper
Pencil
Pins
Tape
Hot glue gun & glue
*In fact, for the skirt portion, I’d probably just recommend buying a skirt pattern that you like and then following that. The skirt I made was too thin and didn’t have a trail like Babd’s did. I was slightly disappointed…
Step One: The Pattern
I started with Babd’s bust piece, as I knew this would be the most time-consuming and challenging. If you look at the picture of Babd in the comic when she first became the Goddess, you’ll see that there the top of her dress has five front panels that look like they’re made from two different fabrics. However, as I mentioned above, my design used 4 different kinds of fabric. This was mostly because I had this beautiful black lace and awesome black velvet that I really wanted to incorporate. In your own design, feel free to copy her dress more traditionally, but this tutorial will be a guide on the version I made.

First, I made a rough sketch of the final product, and took my measurements and wrote them in beside each side/cut.


Then I drew the image (using my dimensions) onto the tracing/pattern paper and cut it out. But this did not include room for seams, so don’t do that unless you want to double the amount of work you have to do! I would instead recommend drawing and cutting each piece individually and giving yourself a 0.5” seam allowance. My top wound up being very small (somehow magically fitting just barely).

You’ll notice from my pictures that, once I cut out the general front and back pieces, I had to then re-cut pieces to include the seam allowance. *palm face* The joys of being self-taught! Anyways, eventually you’ll have something that looks like this:

Step Two: The Fabric
Using the templates created above, the next step is to cut out all of the fabric! I created a new template to help me remember which fabric was going where.

For the front, Panel A will be velvet and Panel B is the same fabric as the skirt. The lace I used had to be laid over another fabric (otherwise it would’ve been see-through), and at first I intended to use the lace for both Panel C and Panel D, but either because it was too difficult, or because I thought it would look better, I wound up just using the silky black for Panel C and using the lace on top of the silky black for Panel D. Also notice: whereas Panel A, B, & C are used for both the right and left side of the top, Panel D is the center piece and so you only need to cut one piece out for it.
Now, this isn’t a trick I knew during the first ten cosplays I created, and maybe you already know it, but if you fold your fabric over itself, you can lay your template on top and cut out both the left and right sides of each Panel at the same time! Rocket science? Witchcraft? Maybe both? I think so! Once you have all of your fabric cut, it should look something like the picture below (from top to bottom, that’s the outer backside panel, Panel B, Panel A, Panel D, Panel C, and the center backside panel).

The next step is the fun part: time to put all of the pieces together! It’s at this point in the process that you finally get to go, “Ohhhhh, I can kind of see it now!” The pictures below are showing you the front of each piece, but when you pin them together, you’re going to want the pins on the backside so that, as you sew, you can remove the pins more easily. To piece the front together, connect 1 Panel A, to 1 Panel B, to 1 Panel C, to Panel D, to the other Panel C, to the other Panel B, and to the final Panel A. For the back piece, connect each of the outer backside panels to one of the center backside panels, but DO NOT pin together the two center backside panels. You will be sewing a zipper here so make sure these pieces don’t get sewn shut!


Since you can’t really see the fabric all that well in any of the pictures (sorry that my camera was not working well!), here is a close-up of the velvet, shiny fabric, and the lace.

Okay, I forgot to say this before, but you can go ahead and pin each backside section to the front side. Make sure you’re pinning the left side to the left, and the right side to the right. At this point in the process, I decided to try mine on to make sure it would fit correctly. If yours doesn’t, now is the point in the process when you want to make adjustments!

If you’re ready to go forward, now we sew! I started with one side of the back of the top, so that I could work my way all the way around to the other back. I used the most basic setting on my sewing machine, single stich, not too tight, not too loose. I went made sure to change needles when I was working with thicker fabric (the velvet was like denim!) or stretchy fabric (like the lace).

If you’re like me, it was at this point in the process that I realized my top was too wide for my body, so I also had to go back and sew a new seam. But since I’m not a professional and I have no clue what I’m doing, I just sewed a couple inches in more and then cut the remaining fabric. It looked really tacky on the inside after that!

Because it looked so tacky, I decided I want to do something even extra. Using the templates of the full front and full back from earlier, I cut out some liner and sewed those together. Then I ironed on some interface and sewed the liner to the top itself. I sewed along the bottom and the arms, leaving the zipper part open again…

I would say that I could’ve skipped this part, but because I was so excited about how it looked on the outside, I wanted to continue with the professional feel on the inside. And boy was I happy with the final result!
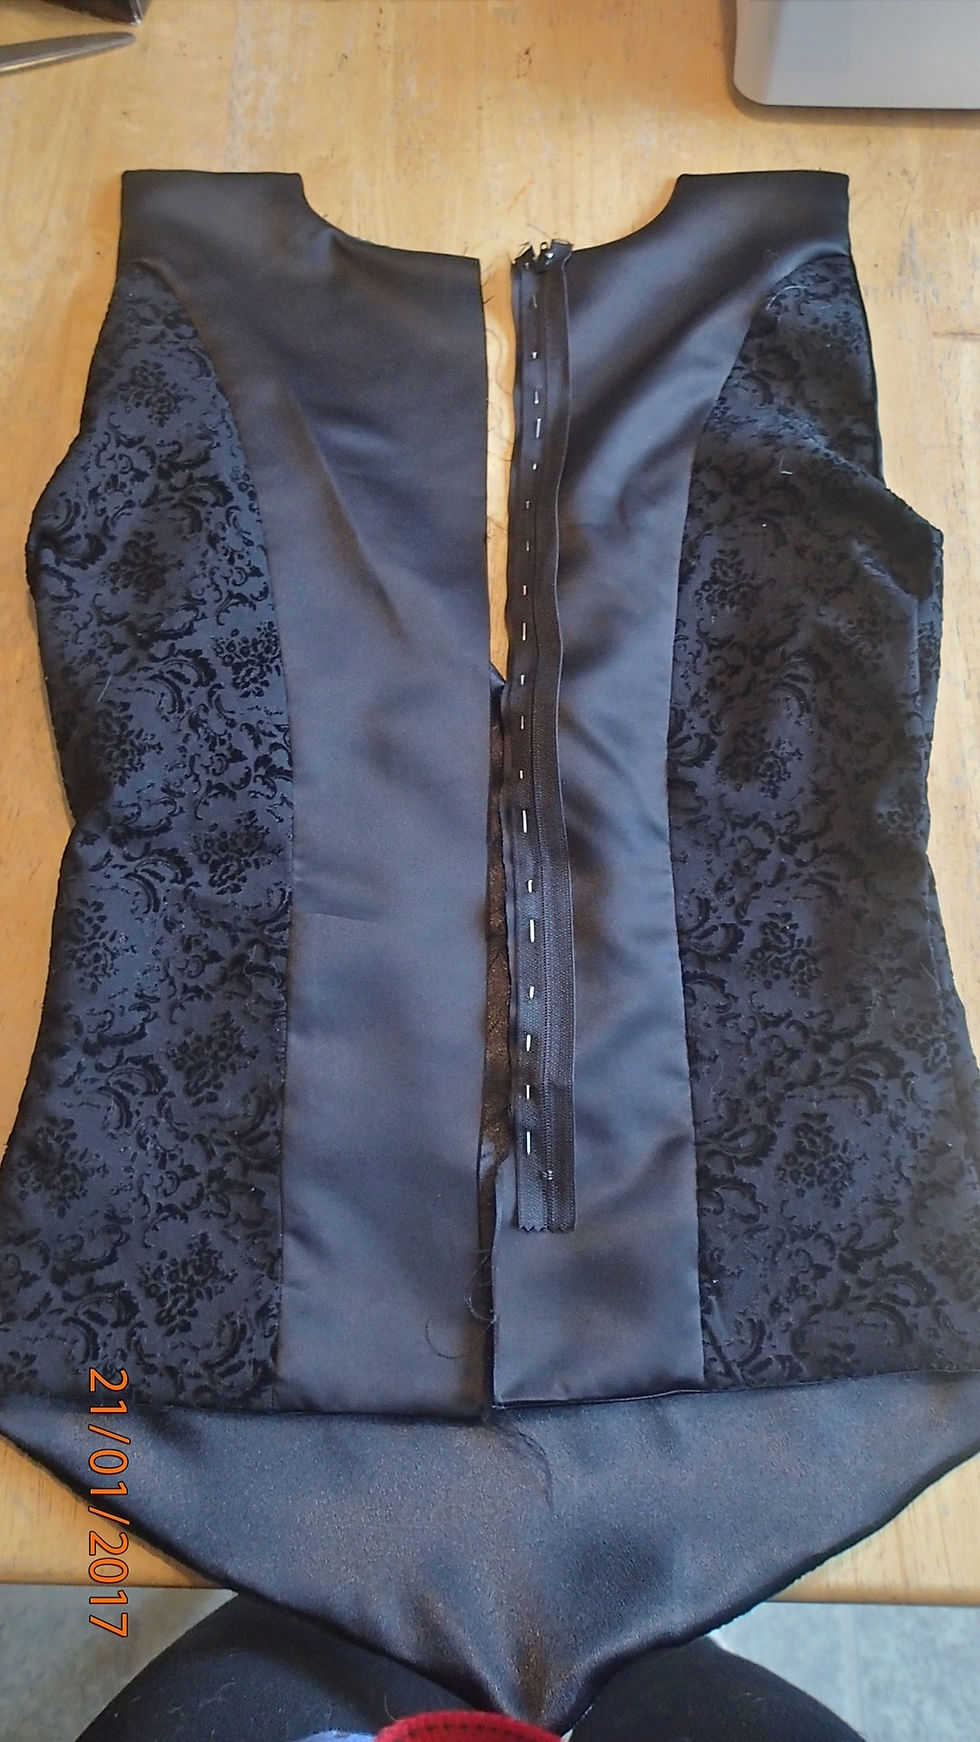
The second-to-last step is the zipper, which you can see I had already pinned down. You’ll want to make sure the zipper is on top of the fabric, facing the fabric when you sew it on, so that when you get the other side sewn, the zipper is actually facing outward. Not that I speak from an unfortunate experience of sewing a zipper on inside out… O.O

The LAST step of sewing for the shirt, is the lacey arm. This was admittedly an afterthought. I spent so much time perfecting the panels and whatnot, then when I was finished and I compared it to a picture, I slapped y forehead and remembered I’d left off a sleeve. Luckily, I had all this extra lace to place with! And, luckily, sleeves are mostly easy to make. Just take your dimensions, cut a single piece of fabric, and sew it together.

As mentioned above, the skirt was not something I was proud of. Actually, I was extremely upset with the end result. So much so, that I didn’t even take any pictures of the process! Sorry… But, I do think you’d be better off following a pattern or something, to achieve the look you’re looking for.
Once you have your skirt complete, you’re basically done with the sewing part!
Step Three: The Accessories
I made three accessories to cosplay Babd: a collar of feathers, hip pads with feathers, and a feather earring. Since I have gauges ears, for the feather earring all I did was purchase a long feather piece of jewelry and tied fishing line around it and hung it out of one of my gauges. But, the other two, I can provide some step-by-step guidance!
Let’s start with the collar. Start by measuring the distance around the backside of your neck, from one shoulder to the other. You’re going to want this piece resting on your shoulders (I used Velcro to make it stick), so make sure it’s long enough. (You’ll notice in the picture below that I’ve added more velvet to mine. That’s because it sticks up a little and I didn’t want the cardboard showing through. But this is completely optional! If you decide to do it, I just hot-glued the edges of the fabric to my cardboard—on the side where you will be gluing the feathers, not on the side that the fabric is covering).


Next, I purchased some strings of feather trim from Amazon. At first, I only bought 1, but quickly realized I needed 2 more. If I would've had more time, I might've even bought a fourth to try to make everything more feathery! Anyways, instead when I laid them down and I wasn’t getting the volume I’d hoped for, I went to my local craft store and purchased single feathers, gluing them on the back row, and throughout for more bulk.
So one layer at a time, I glued rows of feathers onto the cardboard collar. Make sure to start at the top of your cardboard so that the feathers will layer on top of one another until you achieve something that looks like this:

Don’t forget to add some Velcro to the backside of this collar piece, and to the shoulders of your costume. I hot-glued both but then I had trouble with the Velcro on the costume the entire time I wore it. I would advise sewing these pieces on instead.

And here is what it will look like when you're done:


I still wasn’t too happy about the volume though, so for the hip pads, I took a different approach. Once again, you’ll start by measuring one hip and cutting cardboard out. For the hip piece, it’s important that you bend and mold it to your hip so that it’s not just laying flat. This time, instead of just one piece of cardboard though, I decided to layer it using hot-glue. Again, really important that in between each layer you bend and mold the cardboard to your hip, otherwise you won’t achieve a curved look.

Then, much like with the collar, I began hot gluing the string of feathers onto each layer. Admittedly, this also wasn’t quite as bulky as I was hoping for. If I ever did it again, I'd probably double-up each layer of cardboard.
The final step was to hot glue the hip pieces onto a piece of ribbon to be used as a belt.

Step Four: The Completed Product
Once you’re done sewing and done making accessories, you can put the costume on and marvel at its glory! To make sure your cosplay is top notch, don’t forget to do the iconic Babd black mask (I just used eye shadow) and to add some birds to the arm without a sleeve (I got my stencils here and just used eye shadow again).

And there you have it! Thanks for checking out this tutorial on how to DIY The Morrigan/Babd from The Wicked + The Divine graphic novel series!
If you have any questions about this DIY tutorial, or suggestions on how to make the best one better, feel free to leave them in the comments below! I'd also like to know what your favorite characters are (from comics, movies, shows, video games, etc)?
Lastly, if you like comics/graphic novels and want to see which ones made my Best Reads of 2018 list, click here! Or, follow me on Goodreads to join me on a graphic novel reading-extravaganza!
Stay Nerdy!
Jessaca
author: The Awakened series


Comments